
Add Distortion To Your 808 Using Waves Manny Marroquin Distortion Plugin
Hey what’s going on music makers? Want to learn how to add distortion to your 808 using waves plugins?
Well I’ve got you covered on that and more! I’ve started up a new YouTube series called “Wavy Wednesdays”.
Each Wednesday, I will be dropping a new video covering a new Waves plugin and will be showing you guys how you can use it in your music creation and/or mixing processes.
I’m starting off the series by highlighting different Waves plugins you can use to mix and boost your 808. In the second episode, I reviewed the Waves Manny Marroquin Distortion plugin, which is a distortion plugin that is part of the Manny Marroquin Collection.
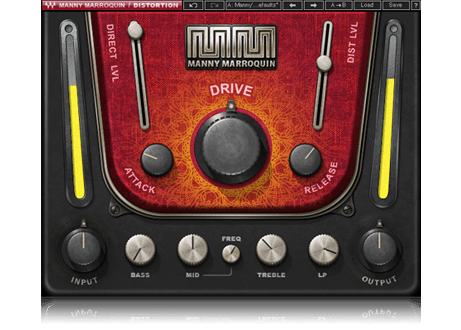
Waves Manny Marroquin Distortion Plugin
I pull up my Pro Tools Session and show you how I used the Waves Manny Marroquin Distortion plugin on the 808 track in a song I produced called “Ooo Aah” featuring Prince Teejay & Sunny Savage. It’s a dope song, and I encourage you guys to check it out, share it with a friend, and add it to your playlists!
Here’s a link to the full song! “Ooo Aah” – Fly Guy J (feat. Prince Teejay & Sunny Savage)
I also give a quick overview of the plugin and explain what all the knobs and sliders do.
You can watch Episode 2 of “Wavy Wednesday’s” – How To Distort Your 808 Using Waves Manny Marroquin Distortion Plugin below:
Overview of the plugin:
- There’s a distortion section which consists of the three knobs and two sliders in the read area of the plugin
- There’s the EQ section which consists of the five knobs down here at the bottom
- It’s important to realize that this EQ section is only affecting the signal that you’re sending to the distortion. It’s not affecting the EQ of the direct signal. So when you tweak these EQ knobs you’re not affecting the original signal, you’re only EQ’ing the distortion signal.
You also have an Input Knob and an Output knob to control the level of the signal coming into the plugin and the final level of the signal coming out of the plugin.
The Distortion Section:
- The “Direct Lvl” slider controls the amount of the input signal that’s being sent to the output of the plugin. You can kind of look at it as a mixed knob which is determining how much of the original signal you want to blend with the distorted signal.
- If you have it all the way up at a hundred then you’re sending the full direct signal to the output of the plug-in
- If you bring this down to zero then the only thing that you hear coming out of the plug-in is the distorted signal
- Anywhere in between is a mix of the two signals
- the “Dist Lvl” slider controls the amount of distorted signal that’s coming out of the plugin
- If you increase this all the way up, you get a maximum amount of the distorted signal leaving the plugin
- If you decrease this ll the way down you get the minimum amount of distorted signal leaving the plugin
- This slider doesn’t affect the amount of distortion that you’re actually putting on the signal. It’s only controlling the level of what’s leaving the plug-in. You can think of this as the volume slider on your auxiliary track; it’s basically controlling volume of the distorted signal.
- The “Drive” knob controls the actual amount of distortion that you’re putting on to your sound
- If you decrease this all the way down you get very little distortion
- If you increase this all the way up you can get some crazy amounts of distortion
- You can play with the drive knob and the distortion level to shape and blend your sound
- The “Attack” knob controls how fast the distortion effect is applied to your input signal
- Higher equals less distortion at the beginning of the note
- The lower you set the attack, the faster the distortion takes place
- The “Release” knob controls how fast the distortion effect will be released from the note
- As you increase the release knob you’ll hear it more on the tail of the 808 and it will last a longer amount of time
- As you decrease the release knob you’ll hear the distortion clean up faster
The EQ section:
- The “Bass” knob controls how much of the low end frequencies are being affected by the distortion.
- As we decrease this the low end is being affected less
- As we increase this you’ll start hearing more distortion on the low end frequencies
- The “Mid” knob controls the amount of mid-range frequencies that are being affected by the distortion.
- As we decrease this the mid frequencies are being affected less
- As we increase this you’ll start hearing more distortion on the mid frequencies
- The “Freq” knob controls the cutoff point for the mid-range frequencies
- The “Treble” knob controls the high-frequency information and the EQ
- As we decrease this the high frequencies are being affected less
- As we increase this you’ll start hearing more distortion on the high frequencies
- The “LP” knob is a low-pass filter knob
- Everything below the number you set with the LP knob will be allowed to pass through the plug-in and be affected by the distortion engine
I hope that this tutorial will allow you to improve the low-end in your mixes and take your beats up a notch! If you don’t already own this plugin:You can purchase the Waves Manny Marroquin Distortion plugin here: https://waves.alzt.net/XMra4You can check out the latest deals on other Waves plugins here: https://waves.alzt.net/VPM2MDrop a comment and let me know what other Waves plugins you would like me to review in future episodes of my Wavy Wednesday’s YouTube series.
If you haven’t already subscribed to my YouTube channel you can click the link below to subscribe now and get me one step closer to reaching my initial goal of 1000 subscribers!
Click here to subscribe to my YouTube Channel! Thanks for supporting the Channel!
Thanks for stopping by my blog and stay tuned for more mixing and mastering tips!
Keep learning, keep creating, and keep grinding!
~ Fly Guy J
SNAPCHAT

Follow therealflyguyj on Snapchat!